

Perform setting for continuous input (sampling) and continuous output (generating)
Here are the setting for sampling and generating stop condition
|
|
|
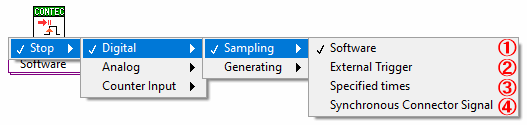
Select to stop sampling of digital input by performing the [Stop] VI *1
Select to stop sampling of digital input by inputting external trigger *1
Select to stop sampling of digital input by the specified times *1
④ Synchronization control signal (DI)
Select to stop sampling of digital input with synchronization control signal *1 *2
Select to stop generating of digital output by the specified times *1
Select to stop generating of digital output by inputting external trigger *1
⑦ Synchronization control signal (DO)
Select to stop generating of digital output with synchronization control signal *1 *2
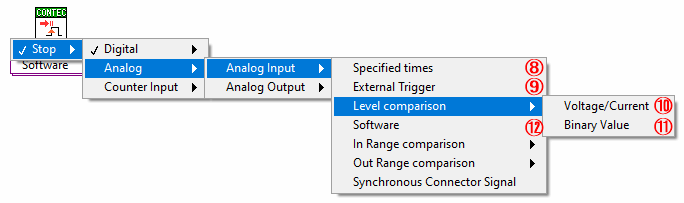
Select to stop sampling of analog input by the specified times
Select to stop sampling of analog input by inputting external trigger
⑩ Level comparison (Voltage/Current)
Select to stop sampling of analog input by satisfying the specified [Voltage/Current] level
⑪ Level comparison (Binary Value)
Select to stop sampling of analog input by satisfying the specified [Binary Value] level
Select to stop sampling of analog input by performing the [Stop] VI
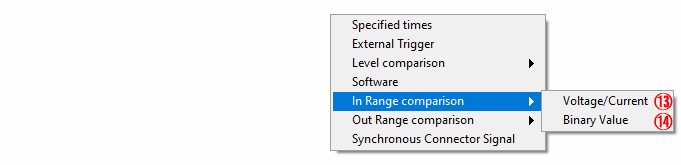
⑬ In Range comparison (Voltage/Current)
Select to stop sampling of analog input by [Voltage/Current] value within the specified range
⑭ In Range comparison (Binary Value)
Select to stop sampling of analog input by [Binary Value] within the specified range
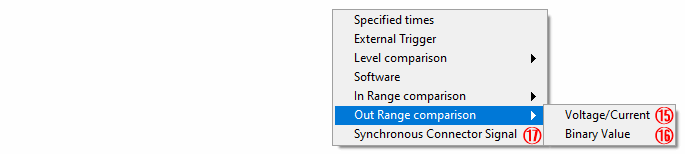
⑮ Out Range comparison (Voltage/Current)
Select to stop sampling of analog input by [Voltage/Current] value outside the specified range
⑯ Out Range comparison (Binary Value)
Select to stop sampling of analog input by [Binary Value] outside the specified range
⑰ Synchronization control signal (AI)
Select to stop sampling of analog input with synchronization control signal *2
Select to stop waveform output when all written data is output
Select to stop waveform output with external trigger input
⑳ Synchronization control signal (AO)
Select to stop waveform output with synchronization control signal *2
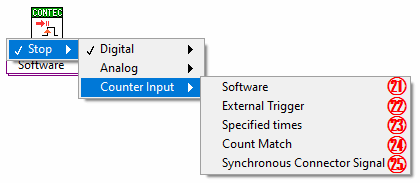
Select to stop sampling of counter input by performing the [Stop] VI *3
Select to stop sampling of counter input by inputting external trigger *3
Select to stop sampling of counter input by the specified times *3
24 Count match
Select to stop sampling of counter input with count match of the specified channel *3
25 Synchronization control signal
Select to stop sampling of counter input with synchronization control signal *2 *3
*The type of trigger that can be selected for analog input and analog output varies depending on the device
Please refer to [Device-specific Setting List]
*1 It can be set only with the following bus master type digital device
PIO-32DM(PCI), DIO-32DM2-PE, DIO-32DM3-PE
*2 It can be set only with device that has a Synchronization Control Connector
*3 It can be set only with the following counter device with sampling function
CNT32-8M(PCI), CNT32-4MT(LPCI)
CNT-3208M-PE, CNT-3204MT-LPE
CNT-3204IN-USB
For example, if the resolution of analog device is 12 bit, as the operation of the hardware, the voltage width of set range will be divided into 4096 (12Bit), the divided value is called binary value. Example: If the range is ±10V The binary value 0 corresponds to -10V, the binary value 2047 corresponds to about 0V, the binary value 4095 corresponds to +10V, and the voltage difference between the binary values 0 and 1 is about 0.004883V (4.883mV)
The voltage value is easy to understand intuitively, but the binary value is directly used by hardware, and there is no calculation error when voltage conversion. So the value is more accurate. And, current is the same. |
