Device Name Setting/Network Setting
Device Name Setting/Network Setting
1. You have to configure the network setting (Device Setting) for CAN-2-WF
in advance.
Please refer the reference manual for DIO-0404RY-LWF to know
the way to configure.
2. After Wi-Fi connecting your PC and this device, start the CONTEC Device Utility.
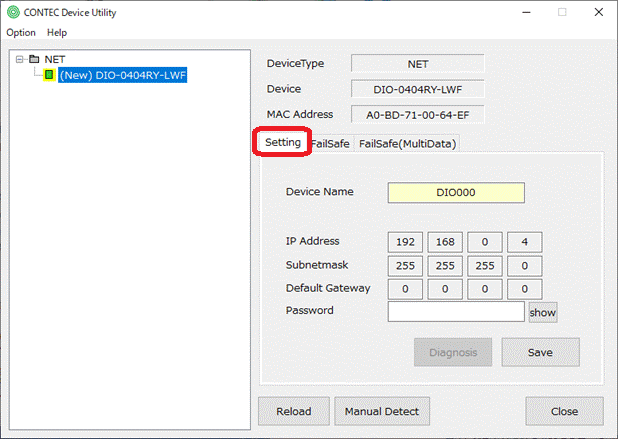
3. When this device is newly detected, "(New) Product Model"
will be displayed in the "NET" tree.
And the temporary device name is displayed in the light yellow on
"Device Name" item.
Please refer "Wireless I/O(Wi-Fi) product is not detected" topic if this device is not detected.
4. Please define Device Name on "Device Name" item.
It cannot have the same name as any other device.
When specifying a device from an application, specify this
device name.
Please enter your password which you have already register
on your device on "Password" item.
You can refer your password when you clock "show"
button.
You can not refer your password when you clock "hide"
button.
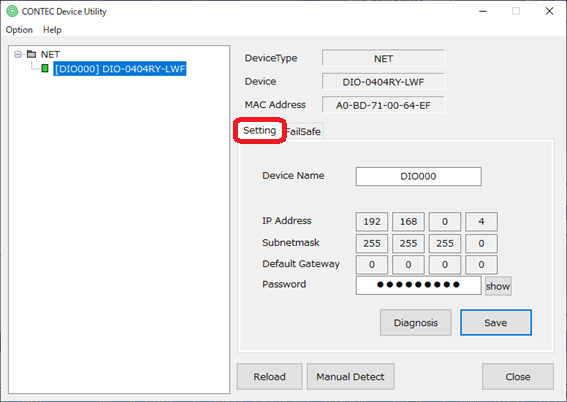
Device Name has been defined after you click "Save"
button.
It
is displayed Fit password is incorrect message and Device Name has
not been defined if you entered wrong password.
5. The configured device is indicated as "[device name] Product
name" under "NET" category tree, and the device name
is displayed in the white on "Device Name" item.
If you select this configured device, the "Diagnosis"
button will be enabled.
Clicking this button will start Diagnostic program and check
the operation.
Fail-Safe Setting
1. After LAN connecting your PC and this device, start the CONTEC Device Utility.
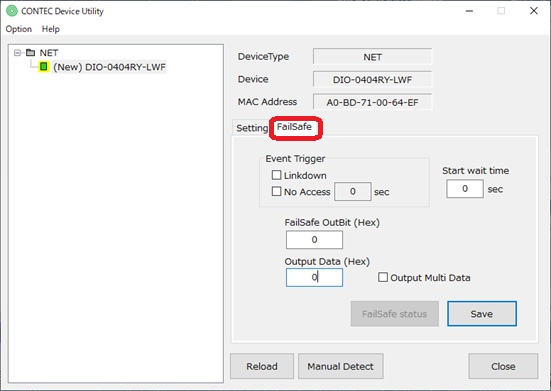
2. Set the following "Setting item" on the "FailSafe"
tab.
To output multiple data with fail-safe, check "Output
Multi Data" and make settings on the "FailSafe(MultiData)"
tab as well.
3. Click the "Save" button.
The target device will automatically reboot and the settings
will be applied.
See also "FailSafe Setting" for details on the fail-safe function.
[Setting item] You can set the selected device
"FailSafe" tab |
|
Event Trigger - Linkdown |
Select this when activating fail-safe when link down state occurs, such as when the LAN cable is disconnected. |
Event Trigger - No Access |
Select this when activating fail-safe when there is no access for the set time. Settable range: 1 to 3600 (sec) |
Start wait time |
Set the time to disable the fail-safe function after turning on the power. The fail-safe function is enabled after the set time has elapsed. Settable range: 0 to 3600 (sec) |
FailSafe OutBit (Hex) |
Set the output terminal to output with the fail-safe function. Set the output terminal in hexadecimal. Settable range: 0 to F Setting example: To use output terminals 0, 1, 2, 3, set F |
Output Data (Hex) |
Set the output data to be output with the fail-safe function. Set 0 or 1 output in hexadecimal from the output terminal set with "FailSafe OutBit (Hex)". Settable range: 0 to F Setting example: To set the output of output terminals 0, 1, 2, 3 to "0, 1, 0, 1", set A |
Output Multi Data |
Check this if you want to output multiple data continuously when fail-safe is activated. When checked, the "FailSafe(MultiData)" tab will appear, so set up multiple data there. |
FailSafe status |
You can check the fail-safe activation state and reset the output when activated. This button is enabled by setting the Device Name. |
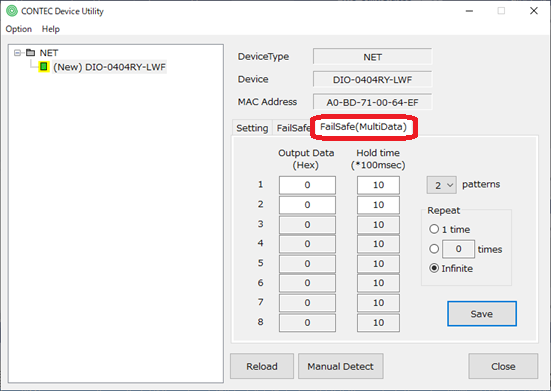
"FailSafe(MultiData)" tab |
|
Output Data (Hex) 1-8 |
Up to eight fail-safe output data can be set. The setting method is the same as above "Output Data (Hex)". |
Hold Time (*100msec) 1-8 |
Set the data output time in units of 100 milliseconds. After this time, the next data is output. Settable range: 1 to 600 (*100msec) |
patterns |
Set the number of data to be output. |
Repeat |
After outputting the number of data set with "patterns", set whether to repeat output from 1 of "Output Data" again. If you do not repeat, select "1 time". To repeat infinitely, select "Infinite". It can also be repeated a certain number of times, the setting range is 2 to 255 times. |
Firmware Update
CONTEC Device Utility cannot update the firmware for this device.
Firmware update is performed with the web browser.
For details, please refer to the reference manual for DIO-0404RY-LWF.
You can download the latest firmware from the product page on CONTEC's website.