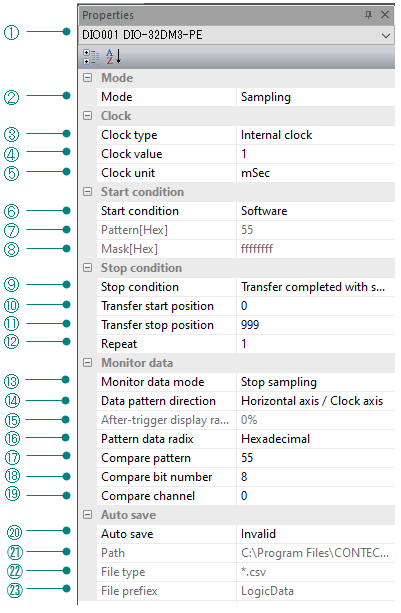
Property window
To set the conditions, select the property window.
Set the items that need to be changed in order from the above properties.
Property window
A list of devices that can be used with this software will be displayed in the list, so select the device you want to use.
Select Sampling.
Settings |
Description |
Internal clock |
Sampling is performed at the timing of the internal clock. |
External clock |
Sampling is performed at the timing of the external clock. |
Handshake |
Sampling is performed using handshake with external equipment. |
This setting takes effect when you select the internal clock as the clock.
Specify the internal clock value in the unit specified in "Clock unit".
Device name |
Settable range |
DIO-32DM3-PE |
20nsec≦ Clock value ≦ 21sec(5nsec unit) |
PIO-32DM(PCI) |
50nsec≦ Clock value ≦ 107sec(25nsec unit) |
* If the number of transferred data exceeds the size of the FIFO of the device, it depends on the PC,
but the actual settable range is about 100ns or more.
Settings |
Description |
1s |
Set the internal clock in seconds. |
1ms |
Set the internal clock in milliseconds. |
1μs |
Set the internal clock in microseconds. |
1ns |
Set the internal clock in nanoseconds. |
Select the conditions to start the device operation.
Settings |
Description |
Software |
Data transfer starts unconditionally when the Start Device Operation button is pressed. |
Rising edge of external trigger |
After the Start Device Operation button is pressed, data transfer starts at the rising edge of the external start signal. |
Falling edge of external trigger |
After the Start Device Operation button is pressed, data transfer starts at the falling edge of the external start signal. |
Pattern match |
After the Start Device Operation button is pressed, sampling starts when the input signal matches the specified pattern. |
Sets the bit pattern to compare.
*This setting is effective when "Pattern match" is selected as the start condition.
Masks the significant bits for the pattern. (Invalid: Bit = 0, Valid: Bit = 1)
*This setting is effective when "Pattern match" is selected as the start condition.
Select the conditions to stop data transfer.
Settings |
Description |
Software |
When the stop button is pressed, the device operation ends. |
Rising edge of external trigger |
Data transfer is stopped at the rising edge of the external stop signal. |
Falling edge of external trigger |
Data transfer is stopped at the falling edge of the external stop signal. |
Transfer completed with specified number |
Transfers data for the specified number of clocks. |
Specify the position of the buffer to start the transfer.
Device name |
Recognized Memory |
OS |
Available range |
DIO-32DM3-PE |
- |
All supported OS |
0≦ Transfer start position ≦ 536,870,911 *2 |
PIO-32DM(PCI) |
The memory less than 4G Byte |
All supported OS *1 |
0≦ Transfer start position ≦ 16,515,071 *2 |
The memory more than 4G Byte |
Windows10 |
0≦ Transfer start position ≦ 262,143 *2 |
|
Windows10 |
0≦ Transfer start position ≦ 524,287 *2 |
Specify the position of the buffer to end the transfer.
Must be set after the transfer start position.
Device name |
Recognized Memory |
OS |
Available range |
DIO-32DM3-PE |
- |
All supported OS |
1≦ Transfer stop position ≦ 536,870,912 *2 |
PIO-32DM(PCI) |
The memory less than 4G Byte |
All supported OS *1 |
1≦ Transfer stop position ≦ 16,515,072 *2 |
The memory more than 4G Byte |
Windows10 |
1≦ Transfer stop position ≦ 262,144 *2 |
|
Windows10 |
1≦ Transfer stop position ≦ 524,288 *2 |
Input the data in the range specified in "Transfer start position" and "Transfer end position" repeatedly for the specified number of times.
*To enable this setting, you need to select "Transfer completed with specified number" as the stop condition.
Device name |
Available range |
DIO-32DM3-PE |
1≦ Repeat times ≦ (536,870,912(20000000H) ÷ ([Transfer stop position] - [Transfer start position] + 1)) |
PIO-32DM(PCI) |
1≦ Repeat times ≦ (16,777,215(FFFFFFH) ÷ ([Transfer stop position] - [Transfer start position] + 1)) |
Select the operation when the data monitoring conditions are met.
Settings |
Description |
Invalid |
Disable data monitoring. |
Stop sampling |
Stop sampling. |
Graph automatic update |
Updates the displayed contents of the graph to the data at the time of matching. |
Select the direction to compare with the data pattern.
Settings |
Description |
Horizontal axis / Clock axis |
Monitor if the data matches in the clock axis direction. |
Vertical axis / Channel axis (in graph display order) |
Monitor if the data matches along the channel axis. |
It is the display ratio before and after the match on the graph when the
data monitoring conditions are matched.
Set the entire graph to 100% and specify the display ratio after triggering.
*This setting is effective when "Graph automatic update" is selected in the data monitoring conditions.
Select the radix of the comparison pattern from binary or hexadecimal.
Enter the number you want to compare.
Enter the number of bits to compare in the comparison pattern.
Specify the comparison channel for the comparison pattern.
When the data pattern direction is the vertical axis, specify the first channel.
When enabled, sampling data is automatically saved to a file under the specified conditions.
When collecting data for a long time, the collected data of the memory size set in the sampling memory option
is divided and saved at the timing when it is accumulated.
In this case, the file name is automatically created based on the time when the data collection started.
Example) When data collection starts at 2:05:10.000 pm on March 1, 2020,
and 10 seconds later, data for the memory size is accumulated and saved,
the file name will be "20200301_140510000" based on the start time "2:05:10 pm".
Also, the file name saved again 10 seconds later will be "20200301_140520000".
Even if it is disabled, it can be saved manually, but if the memory reserved
by the sampling memory option is used up, the old data will be discarded in sequence and only the latest data can be saved.
If you want to save all the data with long sampling time, please use auto save.
Set the path to save the file.
Select the format of the file in which you want to save the sampling data.
Settings |
Description |
*.csv |
Save in CSV format. |
*.cpb |
Save in C-LogicDesigner original binary format. |
Specify the prefix used for the file name when saving the sampling data.
The generated file name will be
"prefix" + "date and time" + "extension (.csv or .cpb)"