The DncFFT component can
also be set from the standard Visual Studio property window, but a dedicated
setting screen is provided.
For showing the setting screen, please see Set
the component properties.
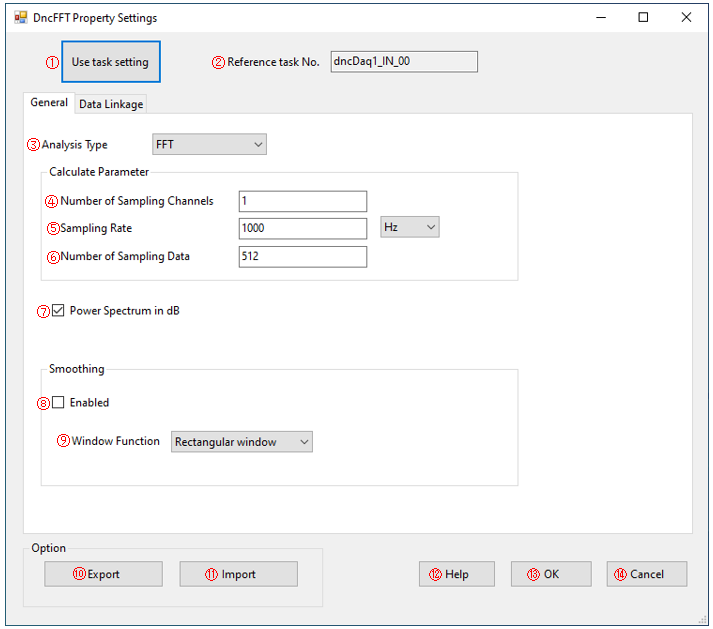
①Use task setting button
Reflects the parameters of the task that references itself.
・Sampling Rate
・Number of Sampling Channels
・Number of Sampling Data
・Enable data linkage.
If the reference task does not exist, the button will be disabled, a "-" will be displayed in the task No., and it will be grayed out. (Message will be displayed when linked)
②Reference task No.
Indicates the Task No. of DncDaq to be linked.
③Analysis Type
Specifies the Fourier transform calculation method (FFT/DFT).
④Calculate Parameter: Number of Sampling Channels
Specifies the number of sampling channels.
⑤Calculate Parameter: Sampling Rate(Hz)
Sets the sampling frequency.
Units can be switched between Hz/kHz/MHz.
⑥Calculate Parameter: Number of Sampling Data
Number of sampling data. Indicates the number of data to be calculated by FFT.
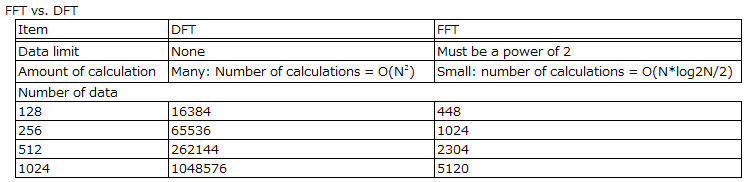
If ③ is FFT, an error message will be displayed if it is not a power of 2.
*When specifying an FFT component in DncDaq, an error will be displayed depending on DFT or FFT.
Common: For ALL, when the number of connections is less 2 / For FFT: When it is not a power of 2
⑦Power Spectrum in dB
Specify this when expressing the power spectrum unit in dB.
⑧Remove DC
Remove DC components of the data that performs FFT/DFT analysis.
⑨Smoothing: Enabled
Applies the window function.
⑩Smoothing: Window Function
Set the window function to multiply the data.
・Rectangular window (has the best frequency resolution, but does not affect amplitude, so signal deviation is most likely to occur)
・Hamming window (better frequency resolution than Hann window and narrower dynamic range (amplitude range))
・Hanning window (one of the most commonly used window functions)
・Blackman window (lower frequency resolution and wider dynamic range than Hann window/Hamming window)
⑪Export button
Displays a dialog to save the setting information being edited in the ini file format (xxx.ini).
⑫Import button
Displays a dialog to specify the ini file format (xxx.ini) to be read.
⑬Help
Open the online help (if you cannot open the online help, open the installed chm help).
⑭OK button
Saves the settings and closes the settings screen.
⑮Cancel button
Closes the settings screen without saving the settings.