Network Setting
1. After USB connecting your PC and this device, start the CONTEC Device Utility.
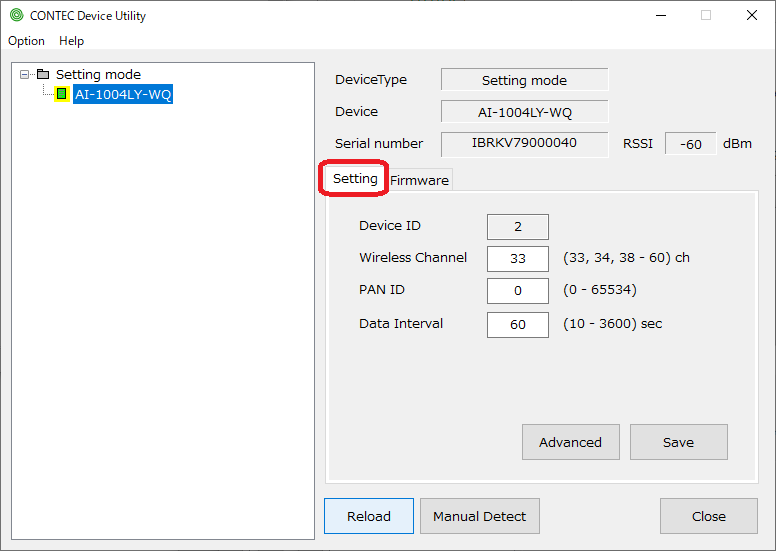
2. When this device is detected by USB connection, "AI-1004LY-WQ" is displayed in the "Setting mode" tree.
3. Set the following "Setting item" on the "Setting"
tab.
To make advanced settings, also make settings on the
"Advanced" tab.
4. Click "Save" button.
While the setting is being written, the LED on the unit
flashes.
When the LED turns on, the target device will automatically
reboot and the settings will be applied.
The setting itself has been completed so far.
5. Please detect the device again and confirm that the setting contents are applied.
6. If you want to change the setting contents, please click "Save" again after changing.
[Device information area] Display information of the selected device
Device Type |
Display device type |
Device |
Display product model |
Serial number |
Display the serial number of the product |
RSSI |
It displays the signal strength of 920 MHz band communication with its own master unit GW1-ETH-WQ. We recommend the signal strength keeps more than -70dB. |
[Setting item] You can set the selected device
"Setting" tab |
|
Device ID |
When using several slave units with one GW1-ETH-WQ, it is necessary to set the Device ID uniquely. [When the product's rotary switch is other than F] The value of the rotary switch is displayed. You can not change here. [When the product's rotary switch is F] Set the Device ID here. Settable range: 0 to 127 |
Wireless Channel |
Set the channel used for 920 MHz band communication. Settable range: 33, 34, 38 to 60 |
PAN ID |
Set the PAN ID used for 920 MHz band communication. Settable range: 0 to 65534 When Device Mode is set to "CONPROSYS mode", PAN ID is fixed to 0. |
Data Interval |
Sets the time interval at which the digital input value of this device is transmitted to its master unit GW1-ETH-WQ. Settable range: 10 to 3600 (sec) |
Click the "Advanced" button to display the advanced settings
dialog.
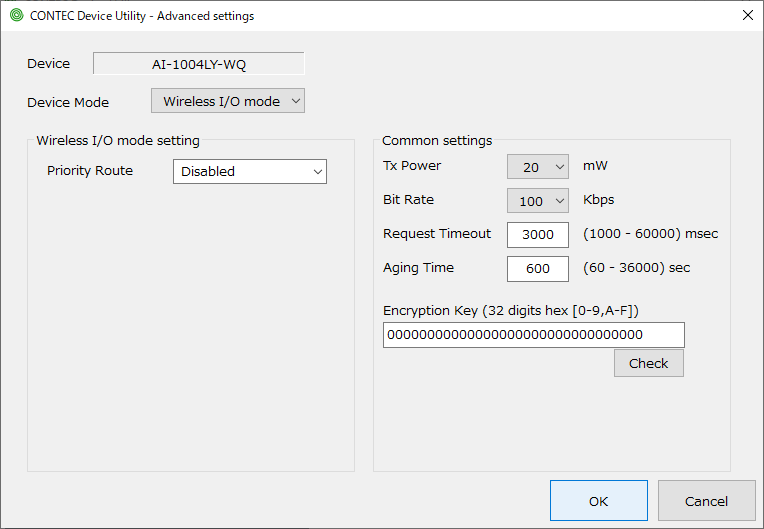
"Advanced settings" dialog |
|
Device Mode |
Select
from the following two modes. - Wireless I/O mode This is the standard mode. Select this mode when using this device with API-DIO(WDM) driver. - CONPROSYS mode Select when using this device as a slave unit of our product CONPROSYS series. It is necessary to set the MAC address of the master device.
|
"Common Setting" |
|
Tx Power |
Set transmission output. Normally, it uses the initial value of 20 (mW). |
Bit Rate |
Set the bit rate (communication speed). Normally, it uses the initial value of 100 (kbps). |
Request Timeout |
Set the communication timeout time between the master unit and slave unit. The initial value is 3000. Settable range: 1000 to 60000 (msec) |
Aging Time |
Set the connection maintenance time between the master and slave. The initial value is 600. Normally, use the default value, but if you have changed Data Interval setting, We recommend changing the value to about 10 times Data Interval setting. Also, when changing this setting, it is recommended to set the same setting for the master unit. Settable range: 60 to 36000 (sec) |
Encryption Key |
Set the encryption key used for communication between the master unit and the slave unit. It is specified with 32 digit hexadecimal number, and the initial value is all 0. In order for the master unit and the slave unit to communicate, the same value must be set in Encryption Key. |
"Wireless I/O
mode Setting" |
|
Priority Route |
If there is a communication route you want to prioritize, specify Gateway if you want to communicate directly with the master unit, and specify the target Device ID if you want to pass through other slave device. - Disabled Do not specify a preferred route - Gateway In an environment where the slave device can directly communicate with the master unit, the master unit has priority. - ID: 0-127 Specify the slave unit that gives priority to relaying. |
"CONPROSYS
mode Setting" |
|
Master MAC Address |
It is not necessary to set it in normal "Wireless I/O mode". When using in "CONPROSYS mode", set the MAC address of the master unit. |
Hop MAC Address |
When relaying the communication of other slaves, register the MAC address of the slave to relay. Up to 100 units can be set. When you click ADD button, the input field will be displayed, so specify the MAC address. To delete the registered MAC address, click DEL button after selecting. |
Device Name Setting
1. Configure the network of GW1-ETH-WQ which will be the master unit
of this device in advance.
If the LED of this device is on in orange, wireless communication
with GW1-ETH-WQ is established.
2. After LAN connecting your PC and GW1-ETH-WQ, start the CONTEC Device Utility.
3. When this device is newly detected via GW1-ETH-WQ, "(New) AI-1004LY-WQ"
will be displayed
under "GW1-ETH-WQ" in the "NET" tree,
and the temporary device name is displayed in the light yellow "Device
Name".
4. Specify the device name in the "Device Name" and click
the "Save" button.
The setting of the device name itself has been completed
so far.
5. The configured device is indicated as "[device name] AI-1004LY-WQ", and the device name is displayed in the white "Device Name".
6. If you select this configured device, the "Diagnosis" button will be enabled.
Clicking this button will start the diagnostic program
and check the operation.
In addition, it is possible to simply display the operating
status with the "Status" button.
7. If you want to change the setting contents, please click "Save" again after changing.
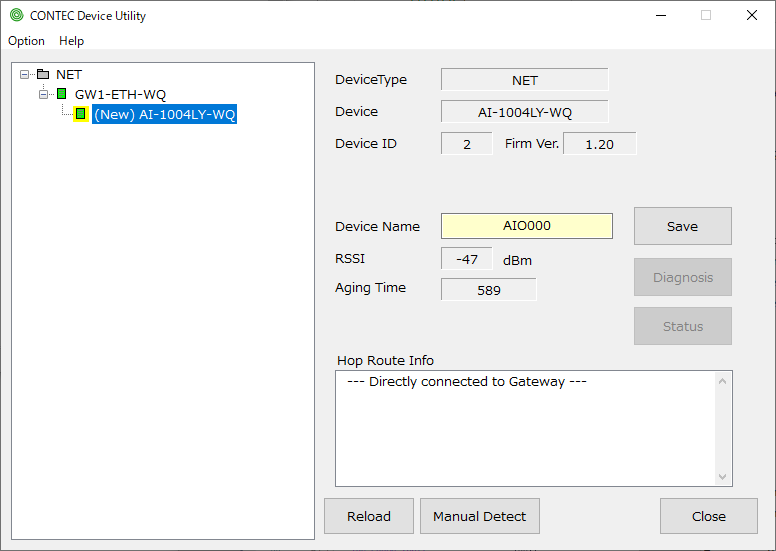
* You can see the status of Hop Route information when you use Hop feature.
It is displayed "Directly connected to Gateway" on Hop
Route Info item when you connect to GW1-ETH-WQ(Master Unit) directly like
above.
Firmware Update
1. After USB connecting your PC and this device, start the CONTEC Device Utility.
2. When this device is detected by USB connection, "AI-1004LY-WQ" is displayed in the "Setting mode" tree.
3. When you select a device and click the "Firmware" tab, "Current version" shows the current firmware version.
4. When clicking "Write new firmware", a file selection dialog
is displayed.
Please select the firmware file to be written.
5. While the firmware is being written, the LED on the unit flashes.
When the LED turns on, the target device will automatically
reboot and the new firmware will be applied.
The firmware update itself has been completed so far.
6. Please detect the device again and confirm that the version of "Current version" has been updated.
