This is an example of a program that performs CAN communication or CAN FD communication.
|
Sample specification |
|
|
Program name |
can_communication_callback |
|
Initial value of transmit settings |
Message Type : CAN Message CAN ID : 0x100 Data Length : 8 Data : 7:7, 6:6, 5:5, 4:4, 3:3, 2:2, 1:1, 0:0 |
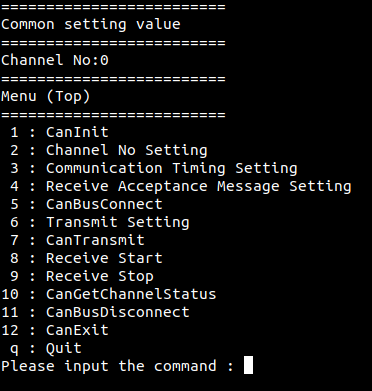
1. Specify the desired program name, run the program, and a CUI (Character User Interface) menu like the one above will be displayed.
Appearance may vary depending on software version.
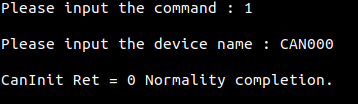
2. Initialize device
・Specify the device name by selecting the [1 : CanInit] command from the CUI menu.
Notifies the device driver to start using the specified device.
After specifying the device name, CanInit will run and the CUI menu will be displayed again.
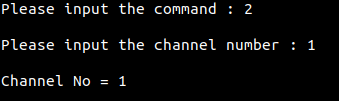
3. Set channel number
・Specify the channel number by selecting the [2 : Channel No Setting] command from the CUI menu.
After specifying the channel number, the CUI menu will be displayed again.
4. Set Timing for CAN communication
For information on CAN communication timing, please refer to "CAN communication transmission time".
For information about the differences between CAN communication and CAN FD communication, please refer to "Difference between CAN 2.0B communication and CAN FD communication".
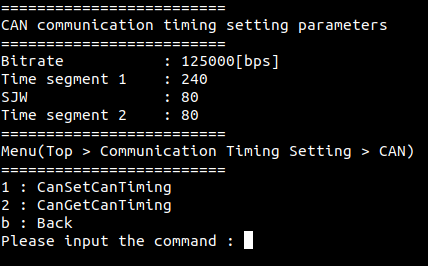
・Select the command [3 : Communication Timing Setting] from the CUI menu, (Top > Communication Timing Setting) menu is displayed.
Select [1 : CAN] from the (Top > Communication Timing Setting) menu, <CAN communication timing setting parameters> is displayed.
Select [2 : CAN FD] from the (Top > Communication Timing Setting) menu, <CAN FD communication timing setting parameters> is displayed.
Select [b : Back] from the (Top > Communication Timing Setting) menu, the CUI menu is displayed again, waiting for you to select a command.

・CAN communication timing setting parameters
In <CAN communication timing setting parameters>, you can check the Bitrate, Time segment1, SJW, and Time segment 2.
When <CAN communication timing setting parameters> is displayed, the (Top > Communication Timing Setting > CAN) menu is displayed, waiting for you to select a command.
Select [1 : CanSetCanTiming] from the (Top > Communication Timing Setting > CAN) menu to specify the timing settings.
Select [2 : CanGetCanTiming] from the (Top > Communication Timing Setting > CAN) menu to get the values already set on the device.
Select [b : Back] from the (Top > Communication Timing Setting > CAN) menu, the (Top > Communication Timing Setting) menu is displayed again, waiting for you to select a command.
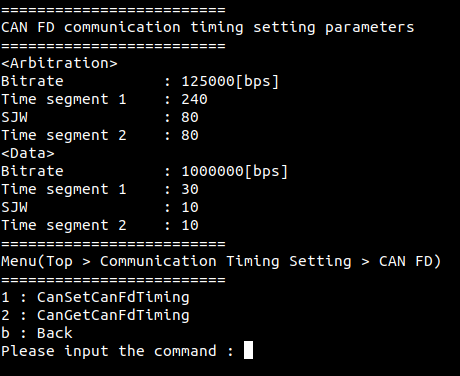
・CAN FD communication timing setting parameters
In <CAN FD communication timing setting parameters>, you can check the Bitrate, Time segment1, SJW, and Time segment 2 of Arbitration Field and Data Field.
When <CAN FD communication timing setting parameters> is displayed, the (Top > Communication Timing Setting > CAN FD) menu is displayed, waiting for you to select a command.
Select [1 : CanSetCanFdTiming] from the (Top > Communication Timing Setting > CAN FD) menu to specify the timing settings.
Select [2 : CanGetCanFdTiming] from the (Top > Communication Timing Setting > CAN FD) menu to get the values already set on the device.
Select [b : Back] from the (Top > Communication Timing Setting > CAN FD) menu, the (Top > Communication Timing Setting) menu is displayed again, waiting for you to select a command.
5. Set for Receive Acceptance Message
For details on the mask specification (CanIdMask) and code specification (CanIdCode) for CAN ID, please refer to "Examples of the combination for CanIdMask and CanIdCode setting".
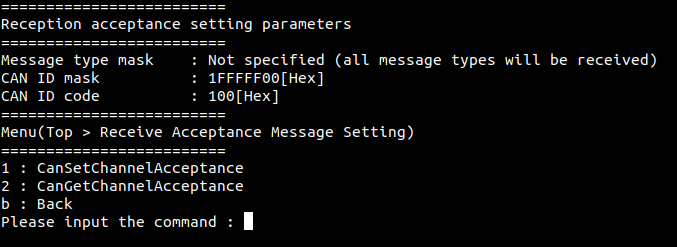
・Select the command [4 : Receive Acceptance Message Setting] from the CUI menu, <Reception acceptance setting parameters> is displayed.
In <Reception acceptance setting parameters>, you can check the message type, CAN ID mask , CAN ID code.
Select [1 : CanSetChannelAcceptance] from the (Top > Receive Acceptance Message Setting) menu to specify the reception acceptance settings.
Select [2 : CanGetChannelAcceptance] from the (Top > Receive Acceptance Message Setting) menu to get the values already set on the device.
Select [b : Back] from the (Top > Receive Acceptance Message Setting) menu, the CUI menu is displayed again, waiting for you to select a command.
6. Start CAN communication
・Select the [5 : CanBusConnect] command from the CUI menu to start CAN communication.

7. Set the transmit data
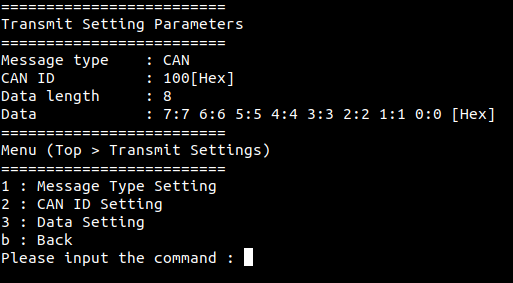
・Select the command [6 : Transmit Setting] from the CUI menu, <Transmit Setting Parameters> is displayed.
In <Transmit Setting Parameters>, you can check the message type, CAN ID, data length, and data.
Select [1 : Message Type Setting] from the (Top > Transmit Settings) menu to specify the message type to be transmitted.
Select [2 : CAN ID Setting] from the (Top > Transmit Settings) menu to specify the CAN ID to be transmitted.
Select [3 : Data Setting] from the (Top > Transmit Settings) menu to specify the data to be transmitted.
Select [b : Back] from the (Top > Transmit Settings) menu, the CUI menu is displayed again, waiting for you to select a command..
8. Transmit data via CAN communication
This sample is designed to only be able to send one CAN message.
・Select the command [7 : CanTransmit] from the CUI menu, to send the pre-configured transmit data.
If you have not configured the transmit message in [6 : Transmit Setting], the "Initial value of transmit settings" in Overview item will be transmitted.

9. Start/stop the data reception via CAN communication
・Select the [8 : Receive Start] command from the CUI menu, the CUI menu will be displayed again, waiting for a command to be specified.
After that, each time a message is received successfully, the received message is displayed and updated, and waiting for a command to be specified.
If multiple messages are received, the most recent message will be displayed overwriting the previous one.
A received message contains the message type, CAN ID, data length, and the received data.

・Select the [9 : Receive Stop] command from the CUI menu, data reception is stopped.
When reception stops, the CUI menu will be displayed again, waiting for a command to be specified.
After that, even if a message is received normally, the display will not be updated.
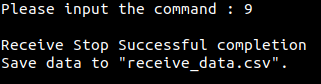
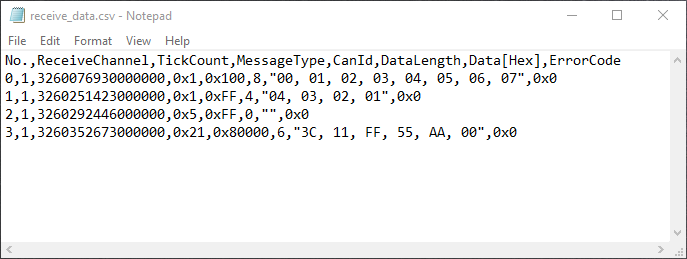
Additionally, all received data will be saved to "receive_data.csv".
10. CAN communication status
・Select the command [10 : CanGetChannelStatus] from the CUI menu, the current status is displayed.
The transmit error count and receive error count are also displayed.

11. Stop CAN communication
・ ・Select the command [11 : CanBusDisconnect] from the CUI menu to stop CAN communication.

12. Exit device
・Select the command [12 : CanExit] from the CUI menu to notify the device driver that the use of the current device is complete.
You can start CAN communication from a different device (e.g. CAN001, etc.) without terminating the program.
To perform CAN communication again, select [1 : CanInit] command from the CUI menu to initialize the device.

13. Exit program
・Select the command [q : Quit] from the CUI menu to terminate the program.