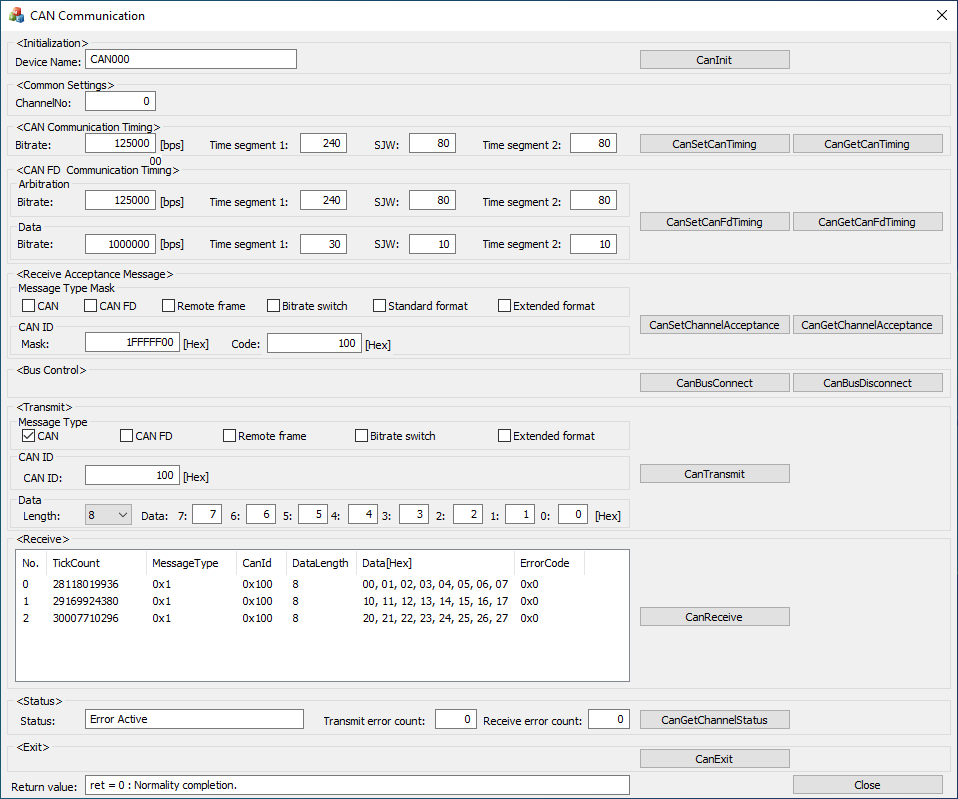

This is an example of a program that performs CAN communication or CAN FD communication.
Sample specification |
|
Program name |
CanCommunication |
1. Specify the desired program name, run the program, and a window that
looks like the one above will appear.
Appearance may vary depending on software version.
2. Initialize device
- Specify the device name set in the device manager as the
device name, and click the [CanInit] button.
Notifies the device driver to start using the specified
device.
3. Set Timing for CAN communication or CAN FD communication
- For CAN communication
Specify the desired Bitrate, Time segment1,
SJW, and Time segment 2 in the <CAN Communication Timing> field,
and press the [CanSetCanTiming] button.
Press the [CanGetCanTiming] button to load the values
set in the device.
- For CAN FD communication
Specify the desired Bitrate, Time segment1,
SJW, and Time segment 2 in the <CAN FD Communication Timing> field,
and press the [CanSetCanFdTiming] button.
Press the [CanGetCanFdTiming] button to load the values
set in the device.
4. Set for Receive Acceptance Message
- Enable the checkbox for the message type for Receive Acceptance
Message.
Enter the CAN ID filter value of the Receive Acceptance
Message in hexadecimal in the Mask field.
Enter the code value of the Receive Acceptance Message
in hexadecimal in the Code field.
When pressing the [CanSetChannelAcceptance] button, the specified message type, filter value, and code are applied.
- By pressing the [CanGetChannelAcceptance] button, you can read the message type, filter value, and code values set in the device.
5. Start/Stop CAN communication
- To start CAN communication, press the [CanBusConnect] button.
- To stop CAN communication, press the [CanBusDisconnect] button.
6. Transmit data via CAN communication
This sample is designed to only be able to send one CAN message.
- Set the desired transmission data in the <Transmit> field.
Message Type: CAN, CAN FD, Remote frame, Bitrate
switch, Extended format
CAN ID: Specify in hexadecimal.
7. Receive data via CAN communication
When you press the [CanReceive] button, only one received message from the CAN receive buffer on the driver will be displayed in the <Receive> field.
8. CAN communication status
- If you press the [CanGetChannelStatus] button in the <Status> field, the current status will be displayed and updated.
- The display of the Transmit error count and Receive error count will also be updated.
9. Exit device
- Press the [CanExit] button in the <Exit> field to
notify the device driver that the use of the current device is complete.
You can start CAN communication from a different device
(e.g. CAN001, etc.) without terminating the program.
To perform CAN communication again, specify a new device name and press the [CanInit] button to initialize the device.
10. Exit program
- Press the [Close] button in the window to terminate the program.