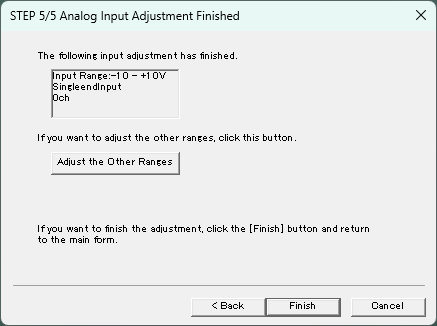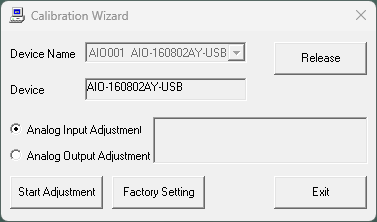
Example screen shot with AIO-160802AY-USB
You can adjust the signal level of your Analog Input device.
You must prepare the calibrated signal generator instruments and signal
cables, separately.
Here is the procedure for Analog Input adjustment.
1. Please select "Analog Input Adjustment"
item on "Calibration Wizard".
Then, click "Start Adjustment" button.

Example screen shot with AIO-160802AY-USB
2. "STEP 1/5 Analog Input Adjustment" Dialog is showed up.
Please select "Input Range" and "Setting Method".
Then click "Next >" button.
On the default, Setting Method = "Auto", Signal = "Single End", Input = "0ch".
In the case "Auto", Adjustment Program adjusts
the signal level within the specification of your device, automatically.
CONTEC recommends to use it with "Auto" Setting Method.
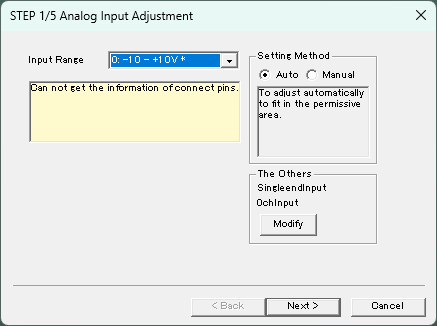
Example screen shot with "-10 - +10V" and "Auto" Setting
Method
3. "STEP 2/5 Analog Input - Offset Adjustment" Dialog is showed
up.
Please connect from target channel's terminals on your device to
the generator instrument which generates "Target Value".
Then, click "Start Adjusting" button on it.
In the case "Auto",
Please click "Next >" button after you see the message
"Automatical adjustment has completed successfully".
In the case "Manual",
Please click "-" or "+" button and stay the
top of slide bar within yellow area.
Yellow area is referred you the specification of your device.
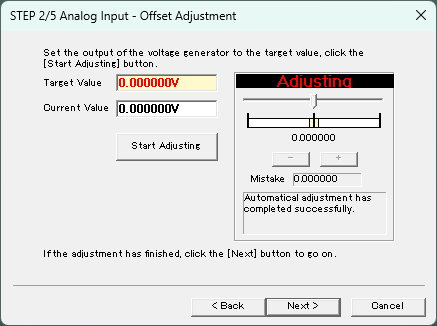
Example screen shot with Target Value = "0.00000V" and "Auto"
Setting Method
4. "STEP 3/5 Analog Input - Gain Adjustment" Dialog is showed
up.
Please connect from target channel's terminals on your device to
the generator instrument which generates "Target Value".
Then, click "Start Adjusting" button on it.
In the case "Auto",
Please click "Next >" button after you see the message
"Automatical adjustment has completed successfully".
In the case "Manual",
Please click "-" or "+" button and stay the top
of slide bar within yellow area.
Yellow area is referred you the specification of your device.
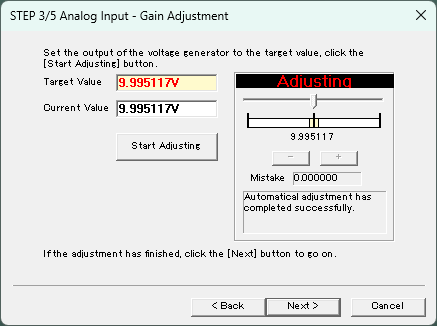
Example screen shot with Target Value = "9.995117V" and "Auto"
Setting Method
5. "STEP 4/5 Analog Input - Middle Range Adjustment" Dialog
is showed up.
Please connect from target channel's terminals on your device to
the generator instrument which generates "Target Value".
Then, click "Start Adjusting" button on it.
In the case "Auto",
Please click "Next >" button after you see the message
"Automatical adjustment has completed successfully".
In the case "Manual",
Please click "-" or "+" button and stay the top
of slide bar within yellow area.
Yellow area is referred you the specification of your device.
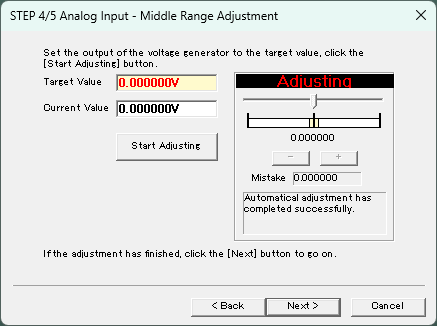
Example screen shot with Target Value = "0.00000V" and "Auto"
Setting Method
6. "STEP 5/5 Analog Input Adjustment Finished" Dialog is showed
up.
The adjustment information is saved to your device.
Here is all done to adjustment procedure.
Please refer "Confirm Adjustment setting on your device" to
make sure procedure is properly.
Please click "Adjust the Other Range" if you adjust
the other input range, too.
Adjustment program is terminated when you click "Finish" button.
