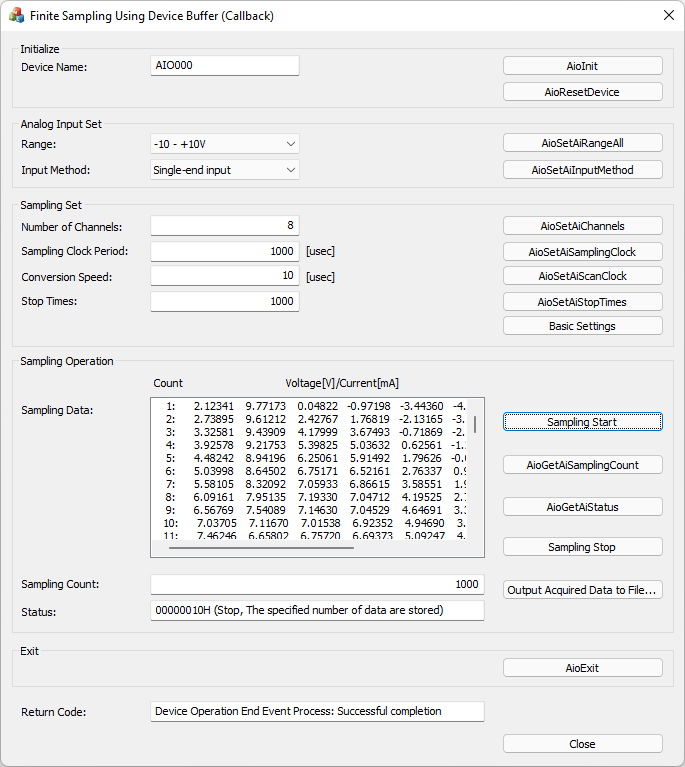

This is a sample that uses event notification as a callback in device buffer mode and performs sampling for the specified number of channels/sampling times.
The number of channels can be specified in the text box.
This sample program requires selecting a device with an analog input function.
| Sample specification | |
| Program name | AiSamplingOnceDevCallback |
| Conversion data transfer mode | 0 (Device buffer mode) |
| Start condition | 0 (Software) |
| Clock type | 0 (Internal clock) |
| Stop condition | 0 (Specified times) |
| Memory type | 0 (FIFO) |
| Buffer size for saving data | 1MByte |
| Event (Callback) | Event that device operation end, Event that overflow, Event that sampling clock period error, Event that AD conversion error |
1. Specify the desired program name, run the program, and a window that looks like the one above will appear.
Appearance may vary depending on software version.
2. Initialize
- Specify the device name set in the device manager as the device name, and click the [AioInit] button.
Notifies the device driver to start using the specified device.
3. Analog Input Set
- Select the desired input range in [Range:] and press the [AioSetAiRangeAll] button.
Depending on the device used, the setting may not be effective unless the input range is changed with the jumper pin on the device.
- Select the desired input method in [Input Method:] and press the [AioSetAiInputMethod] button.
4. Sampling Set
- Enter the desired number of channels in [Number of Channels:] and press the [AioSetAiChannels] button.
The starting channel number is fixed at 0ch. For example, if 3 channels are specified, data will be acquired from 0ch to 2ch.
- In [Sampling Clock Period:], enter the desired sampling clock period in units of [μsec] and press the [AioSetAiSamplingClock] button.
The minimum sampling clock period that can be specified depends on the device used.
You should also consider the number of channels value you specified.
For details, please refer to the item of [Glossary] sampling clock period error.
- In [Conversion Speed:], enter the desired conversion speed in units of [μsec] and press the [AioSetAiScanClock] button.
The minimum conversion speed that can be specified depends on the device used.
- Enter the desired number of samples in [Stop Times:] and press the [AioSetAiStopTimes] button.
If acquisition of multiple channels is specified in the Number of Channels, the number of data specified in the Stop Times is acquired from each channel.
- When you press the [Basic settings] button, the conditions in the "Sample specification" table above are set to the device.
5. Sampling Operation
- Press the [Sampling Start] button to start sampling.
- Press the [AioGetAiSamplingCount] button to update the displayed value of [Sampling Count:].
- Press the [AioGetAiStatus] button to update the displayed value of [Status:].
- Data sampling stops when the [Sampling Stop] button is pressed.
- When data acquisition is completed up to the specified Stop Times, or when sampling stops, the device operation end callback function is called.
In the callback function, get all the converted data in the FIFO and update the display of [Sampling Data:].
- By pressing the [Output Acquired Data to File...] button, the data displayed in the text box can be saved in a text file.
6. Exit
- Press the [AioExit] button to notify the device driver that the use of the current device is complete.
Data can be acquired from different devices (e.g. AIO001, etc.) without terminating the program.
To perform data acquisition processing again, specify a new device name and press the [AioInit] button to perform device initialization processing.
7. Processing to terminate the program
- Press the [Close] button in the window to terminate the program.