This is a sample that performs sampling with a stop condition other
than the Stop conversion by the specified times in user buffer mode.
Sampling data is added to the file that saves the data at Event that
the specified number of data are transferred.
Sampling will stop if the user buffer is overwritten when collecting
acquired data.
This sample program requires selecting a device with an analog input
function.
Sample specification |
※This is the initial value of the sample program. |
Program name |
ai_sampling_infinite_user.py |
Conversion data transfer mode |
1 (User buffer mode) |
Memory type |
1 (Overwrite the memory) |
Event |
Event that AD conversion start, Event that device operation end, Event that the specified number of data are transferred, Event that overflow, Event that sampling clock period error, Event that AD conversion error |
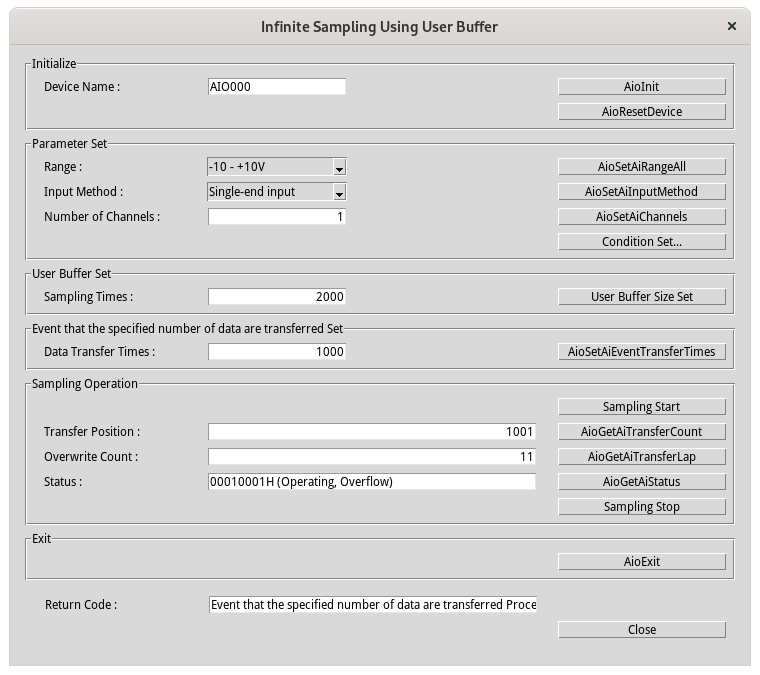
1. Specify the desired program name, run the program, and a window that
looks like the one above will appear.
Appearance may vary depending on software version.
2. Initialize
・Specify the device name set in the Configuration Tool,
and click the [AioInit] button.
Notifies the device driver to start using the specified device.
3. Parameter Set
・Select the desired input range in [Range:] and press the [AioSetAiRangeAll]
button.
Depending on the device used, the setting may not be effective unless
the input range is changed with the jumper pin on the device.
・Select the desired input method in [Input Method:] and press the [AioSetAiInputMethod] button.
・Enter the desired number of channels in [Number of Channels:] and
press the [AioSetAiChannels] button.
The starting channel number is fixed at 0ch. For example, if 3 channels
are specified, data will be acquired from 0ch to 2ch.
4. Sampling condition setting
・When you press the [Condition Set...] button, the "Sampling Condition Settings" dialog box will be displayed.
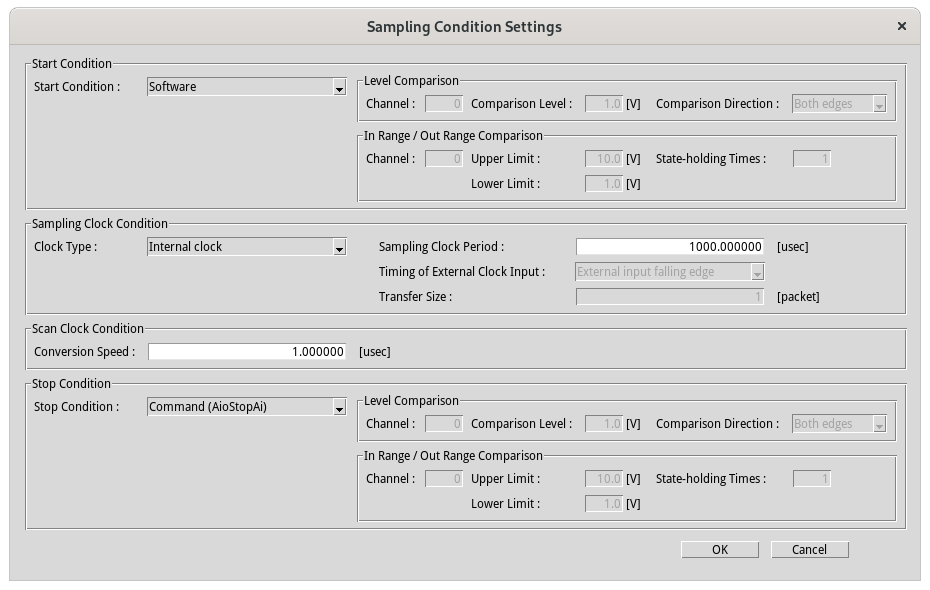
・Select the desired start condition in [Start Condition:].
・Select the desired [Clock Type:] in the Sampling Clock Condition setting.
If the Internal clock is selected, enter the sampling clock period
in units of [μsec]. The minimum sampling clock period that can be specified
depends on the device used.
If the External clock is selected, data will be obtained at the cycle
of the external clock connected to the device.
You should also consider the number of channels you specified. For details, please refer to the item of [Glossary] Sampling clock error.
・In the Scan Clock Condition settings, enter the desired [Conversion
Speed:] in units of [μsec].
The minimum value that can be specified depends on the device used.
・Select the desired stop condition in [Stop Condition:]. Perform Level Comparison settings and In Range/Out Range Comparison settings according to the selected stop condition.
・When you press the [OK] button, all settings in the "Sampling
Condition Settings" dialog box will be reflected in the device and
you will return to the main window.
When you press the [Cancel] button, all settings will be discarded
and you will return to the main window.
5. User Buffer Set
・For [Sampling Times:], specify a value greater than the number of
data transfers, and click the [User Buffer Size Set] button.
Allocate a user buffer in the program memory and notify the device
driver of the buffer memory location.
6. Event that the specified number of data are transferred Set
・Enter the desired number of data transfers in [Data Transfer Times:] and press the [AioSetAiEventTransferTimes] button.
7. Sampling Operation
・Press the [Sampling Start] button to start sampling.
An event occurs when the sampling data for the number of Data Transfer
Times in the "Event that the specified number of data are transferred
Set" is stored.
Data in the user buffer is stored as a file on the storage medium.
・Press the [AioGetAiTransferCount] button to update the displayed value of [Transfer Position:].
・When you press the [AioGetAiTransferLap] button, the displayed value of "Overwrite count:" will be updated.
・Press the [AioGetAiStatus] button to update the displayed value of [Status:].
・Data sampling stops when the [Sampling Stop] button is pressed.
8. Exit
・Press the [AioExit] button to notify the device driver that the use
of the current device is complete.
Data can be acquired from different devices (e.g. AIO001, etc.) without
terminating the program.
To perform data acquisition processing again, specify a new device name and press the [AioInit] button to perform device initialization processing.
9. Processing to terminate the program
・Press the [Close] button in the window to terminate the program.